
Quick Answer
Resin doming production output cannot be estimated from the machine model or dispensing speed alone. The most important variables are the number of dispensing heads, product size and shape, resin volume per part, metering-pump size, tray layout, positioning method, loading time, and acceptable reject rate.
For a regular sheet of simple stickers, a PJ180 semi-auto machine, a DJ771 3-axis machine, and an SJ4060 CCD vision machine can all use the same multi-head dispensing principle. If all three use the same five-head arrangement as the demonstration and comparable metering pumps, their dispensing output may be closer than buyers expect. The main difference is how much positioning and tray handling the operator must perform.
The practical rule: estimate output from a tested tray cycle, not from a universal pieces-per-hour claim. Maximum speed and maximum dispensing precision are often conflicting requirements.
Key Takeaways
- Start with a tested complete tray cycle. Machine model or dispensing speed alone cannot predict accepted shift output.
- Head count works only on compatible layouts. Product spacing, path, resin volume, pump displacement, and outlet balance must support parallel dispensing.
- Automation changes labor and positioning work. PJ180, DJ771, and SJ4060 may have similar pure dispensing rates when pumps and active heads are comparable.
- Small shots need a configuration test. The smallest product may require a single head, smaller pumps, or slower controlled flow regardless of the target volume.
- Count accepted products. Loading, tray exchange, curing capacity, inspection, rework, and rejects belong in the estimate.
Why Machine Model Alone Does Not Determine Output
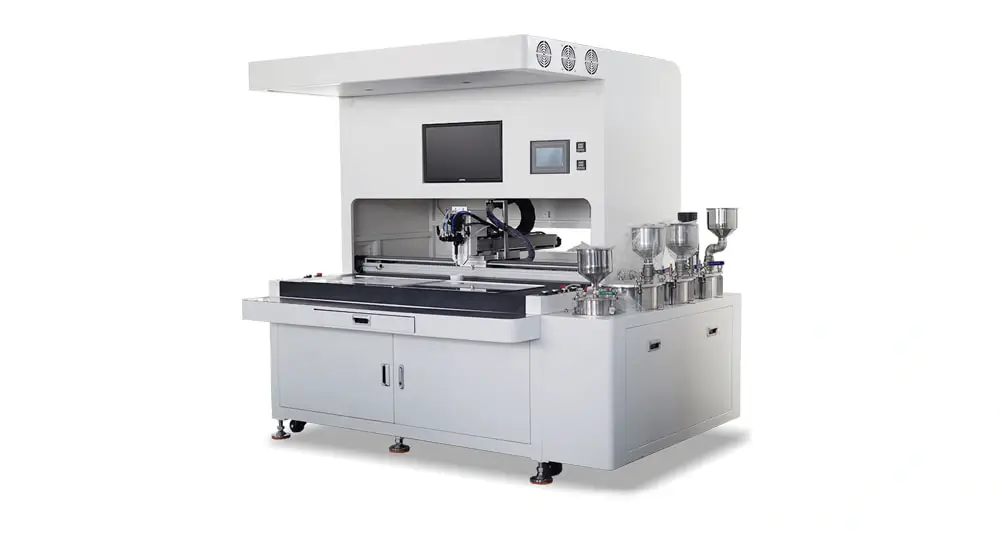
PJ180, DJ771, and SJ4060 use the same general two-component metering and dispensing principle. Their output is not locked to a fixed catalog range because different gear-pump sizes can be selected for different resin volumes and precision requirements.
A large-volume badge, nameplate, or automotive emblem may benefit from a larger pump that delivers more resin per revolution. A very small sticker needs finer volume control, so a smaller pump and a single needle may be more appropriate even though the theoretical production rate is lower. This is why a useful output estimate must start with the product and resin, then work back to the pump, dispensing-head configuration, and motion system.
The Six Variables That Control Real Production Output
Number of dispensing heads
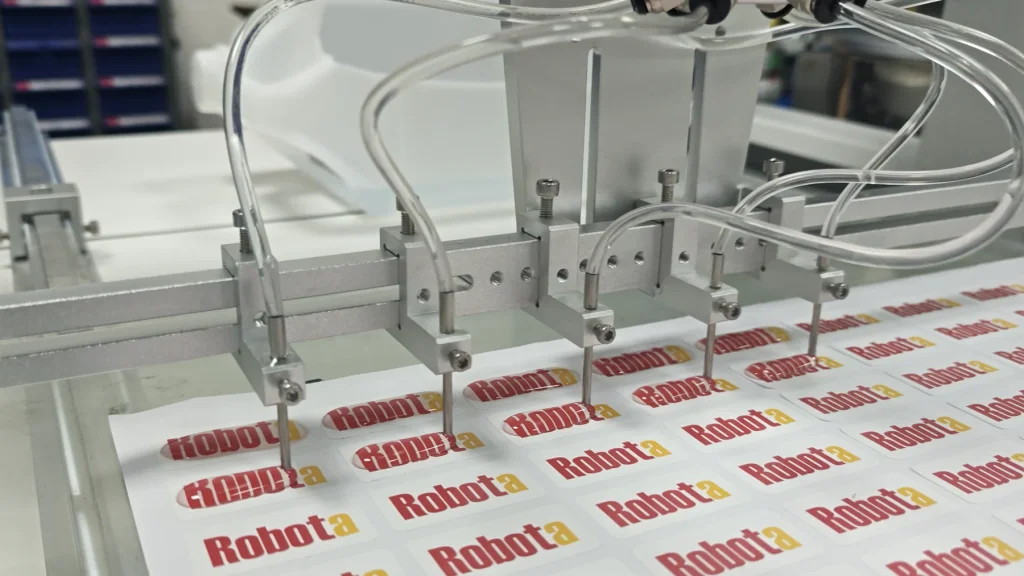
A five-head configuration, such as the one shown in the current DJ771 demonstration, can dispense five compatible positions in parallel, but it only works when the product spacing, resin flow, needle spacing, and tray layout allow all five needles to land accurately. Robota’s standard multi-head assembly supports up to eight dispensing heads. Higher head counts can be custom engineered after the product spacing, resin balance, and mounting layout are validated. Adding more heads does not automatically improve usable output if alignment becomes difficult or some positions require correction.
Product size and shape complexity
Simple circles, rectangles, and regular logo shapes are easier to arrange and follow with repeat paths. Small details, narrow areas, holes, cutouts, mixed orientations, and irregular placement may require slower movement, a more carefully optimized path, or CCD positioning. Product complexity can therefore affect both cycle time and reject rate.
Resin volume per product
A higher dome or larger surface area requires more resin. Even when two sheets contain the same number of products, the sheet with the larger target volume will normally take longer to dispense. Resin viscosity and temperature can also change how quickly the target volume can be applied without tailing, overflow, or bubbles.
Metering-pump size
There is no single fixed dispensing-speed range for each machine model. Pump displacement should be selected around the required resin volume and the smallest product that must be produced reliably.
For example, a 1:1 polyurethane resin process that must also handle very small stickers may be evaluated with two 1.2 cc gear pumps or two 0.6 cc gear pumps. A 3:1 epoxy resin process may be evaluated with 2.4 cc and 1.2 cc pumps, or with 1.2 cc and 0.6 cc pumps. These are configuration examples, not universal prescriptions; the final selection requires testing the actual resin, target volume, and product.
| Production condition | Configuration example to evaluate | What must be confirmed |
|---|---|---|
| 1:1 polyurethane resin with a need to handle fine, low-volume dispensing | Two 1.2 cc gear pumps or two 0.6 cc gear pumps | Minimum stable shot, resin viscosity, target dome volume, and the smallest product |
| 3:1 epoxy resin with relatively fine volume control | 2.4 cc + 1.2 cc, or 1.2 cc + 0.6 cc gear pumps | Mix ratio, A/B delivery stability, target shot volume, and required accuracy |
| Larger products with higher resin volume | Evaluate a larger displacement combination from the real shot requirement | Cycle time, edge hold, bubbles, flow stability, and whether small products must use the same machine |
| Small or precision-sensitive products | Start by evaluating single-head dispensing with smaller pumps | Needle placement tolerance, minimum controllable volume, and accepted sample quality |
Do not select a pump from product width alone. Product area, dome height, resin type, mix ratio, viscosity, number of heads, and the smallest required shot all affect the final pump choice. The combinations above are sample-testing directions, not universal pump recommendations.
Tray positioning and operator work
On PJ180, the operator controls product positioning and may move the sticker tray after each completed row. DJ771 follows saved coordinates automatically after the tray is placed at the correct reference position. SJ4060 can identify product positions within its effective working area, reducing the need for exact tray placement. These differences change operator workload and the amount of non-dispensing time in each cycle.
Loading, curing, inspection, and rejects
A fast dispensing cycle does not guarantee the same number of accepted products per shift. Trays still need to be loaded, transferred, leveled, cured, inspected, and replaced. If curing racks, operators, or quality inspection cannot keep up, increasing dispensing speed will not improve final output.
PJ180 vs DJ771 vs SJ4060 for Regular Sticker Sheets
PJ180
Flexible manual positioning
Choose when: products change frequently, batches are smaller, and an operator can move the tray reliably.
Output limit: the operator must remain involved in row changes, tray movement, and loading rhythm.
DJ771
Automatic paths for repeat trays
Choose when: product positions repeat and a fixture or reference point can keep every tray aligned.
Output advantage: the machine runs the saved path while the operator prepares the next tray.
SJ4060
Vision alignment for variable placement
Choose when: mixed layouts, print shift, holes, cutouts, or free placement make fixed coordinates unreliable.
Operational advantage: less exact tray placement and lower positioning-related reject risk on suitable products.
For simple, regularly spaced stickers, the difference between these machines is mainly labor and positioning automation rather than a completely different dispensing capacity. A buyer comparing them should therefore ask two questions: how much operator involvement is acceptable, and how stable is the real product position from tray to tray?
For a wider comparison of layout, positioning risk, and resin validation, read How to Choose the Right Sticker Doming Machine and the Semi-Auto vs Automatic Doming Machine guide.
Speed and Small-Shot Control Can Trade Off
Higher combined flow or more parallel outlets can shorten active dispensing time, but the pump displacement, needle spacing, and path must still control the smallest target resin volume. A larger pump or multi-head setup is not inherently inaccurate; the risk appears when the chosen configuration is too coarse for the product and acceptance limit.
There is no universal product-width threshold. Test the smallest resin area, target dome volume, edge distance, resin viscosity, mix ratio, pump displacement, needle, and accepted reject level before fixing the production configuration. Use the single-head vs multi-head guide for the detailed spacing, balance, and small-shot decision.
Buying risk: do not choose the largest pump or greatest number of heads before confirming the smallest product and target shot that the line must control.
A Verified Output Example for Regular Logo Stickers
The following DJ771 production video shows multi-head dispensing on a regular sticker layout. Use it as visual evidence of the dispensing pattern and cycle, while keeping the result tied to the tested product, resin volume, pump configuration, needle spacing, and programmed path.
DJ771 multi-head production demonstration. The reference data below uses five dispensing needles, 120 regularly arranged Robota logo stickers measuring approximately 1.95 × 4 cm, and an observed tray cycle of about 45 seconds. This is a sample-specific result, not guaranteed universal output.
The following figures are useful as a sample-specific benchmark. They are not guaranteed output ranges for every customer or product.
| Test condition | Observed or estimated result | Important boundary |
|---|---|---|
| DJ771, five needles, 1.95 × 4 cm Robota logo stickers, 120 pieces on a regular layout | Approximately 45 seconds per tray | Cycle time may change by about ±8 seconds as resin volume, needle path, and path optimization change. |
| PJ180, five needles, the same sticker and a layout that only requires tray movement after each row | Estimated output about 30–40% lower than the DJ771 example | The operator must maintain a consistent movement and loading rhythm. More manual repositioning will reduce output further. |
| SJ4060, five needles, the same sticker and comparable pump displacement | Estimated efficiency about 10–20% above the DJ771 example | If SJ4060 uses smaller pumps for fine-volume work, simple-sticker output may be close to DJ771. |
The DJ771 observation is equivalent to a mathematical gross rate of 9,600 pieces per hour if the 45-second tray cycle could continue without interruption. That number should not be used as a shift-output promise. Tray replacement, resin replenishment, cleaning, inspection, curing capacity, minor stops, and rejected parts must be deducted to calculate usable output.
How to Calculate Usable Output
- Define one repeatable tray. Record the product dimensions, number of products, layout, resin type, target volume, number of needles, and pump configuration.
- Measure active dispensing time. Include resin delivery and the complete needle path, not only the nominal pump flow.
- Add non-dispensing cycle time. Include scanning or positioning, tray movement, loading, unloading, and any delay between workstations.
- Calculate the gross rate. Divide the number of products on the tray by the complete cycle time in seconds, then multiply by 3,600.
- Calculate usable output. Reduce the gross result for cleaning, resin replenishment, changeovers, inspection, curing constraints, minor stops, and the expected reject rate.
Gross pieces per hour = (pieces per tray ÷ complete tray cycle in seconds) × 3,600
Usable pieces per shift = gross rate × planned running hours × measured process efficiency × acceptable yield
Do not apply a generic efficiency factor if production data is available. A short sample run should be used to measure real tray-change time, interruptions, and accepted yield.
From Tray Cycle to Accepted Pieces per Shift
A shift-output estimate should show the measured inputs behind the result. Do not convert the 45-second DJ771 tray example directly into an eight-hour promise, and do not apply an unsupported industry efficiency range. Measure the time that is unavailable for production and the percentage of finished parts that pass inspection.
| Shift-planning input | What to record | Why it changes usable output |
|---|---|---|
| Pieces per tray | Count the products in the exact production layout | This is the output delivered by each completed tray cycle. |
| Complete tray cycle | Measure dispensing, non-overlapping positioning, and tray-change time | Handling that occurs while another workstation runs should not be counted twice. |
| Unavailable shift time | Record cleaning, resin changes, setup, planned breaks, and other stops | This time must be deducted before calculating completed trays. |
| Measured yield | Use accepted pieces divided by total inspected pieces from a representative run | Gross dispensing output does not include rejects. |
| Curing and inspection capacity | Confirm how many trays can be leveled, cured, moved, and checked per shift | A downstream bottleneck can cap accepted output even when dispensing is faster. |
Available production seconds = scheduled shift seconds − cleaning − resin changes − setup − planned stops
Completed trays per shift = available production seconds ÷ measured complete tray cycle
Accepted pieces per shift = completed trays × pieces per tray × measured yield
Use the dispensing head configuration, pump sizes, resin, tray layout, and operator workflow planned for the real order. If any of these changes, repeat the sample run instead of reusing the previous shift estimate.
Complex Sticker Layouts: Where SJ4060 Creates More Value
DJ771 can follow complex programmed paths, but every tray still needs to match the stored coordinates. A well-designed fixture can reduce placement time and operator fatigue, yet fixed-coordinate production remains sensitive to tray shift, print variation, holes, cutouts, and free placement.
SJ4060 becomes more valuable when these positioning differences would otherwise require repeated manual correction. The operator can place a tray within the effective working area, start the job, and replace the completed tray on the other workstation while dispensing continues.
The following SJ4060 clip shows single-head dispensing on a complex sticker layout. Its main evidence is not a direct multi-head speed comparison with DJ771; it demonstrates vision-based position recognition, automatic path execution, and a workflow that reduces exact tray-positioning work.
SJ4060 single-head production demonstration for complex stickers. Any output calculation from this clip should record the visible sheet layout, number of dispensing points, resin volume, pump size, recognition time, and the exact start and end points used for timing.
For a complex A5 sticker sheet without an unusually high number of extremely small shapes, a reference dispensing time is approximately 7–10 seconds per sheet. The normal interval for changing the tray at the second workstation is about 2–3 seconds. Because tray replacement can occur while the other table is being processed, the dual-station workflow reduces operator waiting time.
This benchmark must still be validated against the actual A5 artwork, number of dispensing points, resin volume, pump size, recognition conditions, and quality requirement. See the CCD Vision Doming Machine Guide for the situations where camera alignment is justified.
Non-Sticker Products: Why Fixtures May Make DJ771 the Better Value
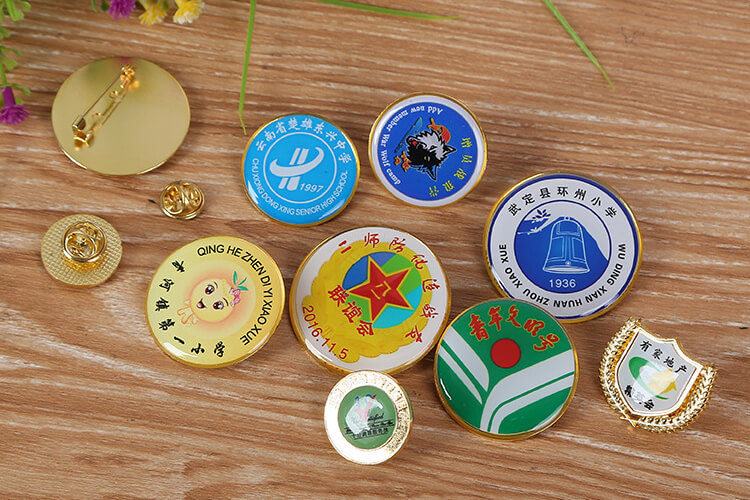
Metal badges, nameplates, automotive emblems, and keychains are often individual rigid parts rather than printed sticker sheets. If a fixture can hold these parts repeatedly at known coordinates, DJ771 can offer a practical balance of automatic movement, repeat placement, and equipment cost.
SJ4060 still provides a wider positioning envelope and requires less exact placement, but that flexibility does not create the same value for every customer. When a stable fixture solves the positioning problem economically, DJ771 may be the better-value configuration.
Application-specific risks differ by substrate and end use. Review the production requirements for domed badges, domed nameplates, automotive emblems, and domed keychains before finalizing the fixture, resin, and machine.
When Maximum Output Should Not Be the Main Goal
- Very small dispensing areas: use a single head and a suitably small pump when multi-head tolerance cannot protect placement quality.
- Frequent product changes: prioritize setup flexibility and cleaning time instead of a theoretical peak rate.
- Unstable resin behavior: solve viscosity, mixing, degassing, moisture, and curing problems before increasing speed.
- Position variation: compare fixture control with CCD vision before assuming a faster fixed path will reduce total cost.
- High-value appearance requirements: calculate accepted products per shift, because a small reduction in reject rate may be worth more than a faster gross cycle.
For resin-dependent decisions, use the doming resin selection center and the epoxy vs polyurethane doming resin guide. A machine configuration cannot compensate for an unsuitable resin, surface, or curing process.
What to Send for a Reliable Output Estimate
- Product photo, drawing, or artwork
- Product dimensions and the narrowest dispensing area
- Number of products and their positions on each sheet or fixture
- Whether positions are regular, mixed, shifted, or freely placed
- Resin type, mixing ratio, viscosity at working temperature, and pot life
- Target resin volume or dome height per product
- Required output per hour, shift, or month
- Current loading, tray-change, curing, and inspection method
- Smallest product that must be produced on the same machine
- Acceptable reject rate and the defects that matter most
- Real samples or a complete tray for testing
These details allow the supplier to compare single-head and multi-head dispensing, select an appropriate pump displacement, test a realistic path, and decide whether PJ180, DJ771, or SJ4060 provides the right balance of output, precision, labor, and flexibility.
FAQ
Which machine has the highest resin doming output?
There is no universal answer. On a simple regular sheet with the same five-head configuration used in the benchmark and comparable pumps, PJ180, DJ771, and SJ4060 may have closer dispensing rates than their automation levels suggest. DJ771 and SJ4060 reduce operator positioning work, while SJ4060 provides the clearest advantage when product locations vary.
Does SJ4060 always produce more than DJ771?
No. On a regular layout, SJ4060 may be approximately 10–20% more efficient under comparable test conditions, but the difference can disappear if it uses smaller pumps for finer dispensing. Its stronger advantage is easier positioning and lower positioning-related reject risk on complex layouts.
Can PJ180 use a multi-head dispensing set?
Yes. PJ180 can use a multi-head dispensing set when product spacing, needle spacing, resin behavior, and the operator workflow support it. Robota’s standard multi-head assembly supports up to eight dispensing heads; higher head counts require a customized and validated layout. The operator must still move or position the tray manually, so output depends more heavily on working rhythm.
Why can a larger metering pump reduce precision?
A larger pump delivers more resin for each unit of movement, which helps high-volume dispensing but provides less fine control over very small shots. Pump displacement should be selected around both the largest resin volume and the smallest product that the machine must produce.
Should very small stickers use multi-head dispensing?
Not always. Very small products require a sample test using the actual resin area, target volume, needle spacing, pump displacement, and accepted edge tolerance. If a shared multi-head path cannot meet the criterion, single-head dispensing with smaller pumps is the safer configuration.
What is the safest way to estimate output before buying?
Run a sample test using the real product, complete tray layout, production resin, proposed pumps, and intended number of needles. Measure the full tray cycle, then account for loading, cleaning, curing, inspection, interruptions, and rejected parts. This provides a defensible usable-output estimate instead of a catalog-speed assumption.
Conclusion
Resin doming output is a configuration result, not a fixed machine specification. Multi-head use and product complexity usually have more influence than the model name. PJ180 can be productive on simple regular products when the operator can move trays consistently. DJ771 improves repeat production by automating the programmed path and freeing the operator for tray handling. SJ4060 offers its greatest value when vision positioning makes complex or variable layouts easier to run with fewer positioning-related rejects.
Start with the smallest product, target resin volume, tray layout, and positioning risk. Then select the number of heads and pump displacement, test one complete tray cycle, and calculate accepted output after handling and quality losses. That process gives a much more reliable purchasing decision than comparing theoretical dispensing speed alone.